
Homemade Pork Jerky (2007-08-01)
We love Taiwan style jerky, that soft chewy savory and yet sweet charcoaled meat slices are just yummy. I saw the recipe on a blog! I'd never thought one could make it at home, so I googled it and saw a whole lot more bloggers making it. So naturally I've gotta try myself.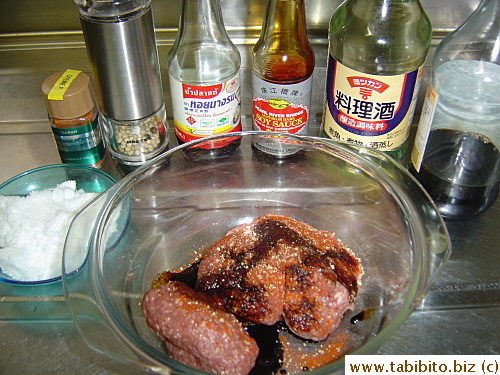


I don't remember the first blogger from whom I got the recipe, so I
can't give her credit here, sorry...:( I have made some
changes to the recipe including seasonings and cooking method but both
the original recipe (oven baking all the way) and mine (oven baking and
barbecuing) yields similarly delicious result.
Lastly, the recipe calls for ground pork, please don't get the extra
lean type. Hey, this isn't lean cuisine, the fat in the meat
gives the jerky a lot of flavor and juiciness and since you're putting
that much
effort into making it, you might as well get the maximum taste for
your labor.
Taiwan Pork Jerky
1. Mix together 350 gm ground pork with 1 Tb each of fish sauce,
dark soy sauce, regular soy sauce, and cooking wine; 1/4tsp cayenne
(because I like spicy jerky, omit or increase amount according to your
taste)
and 90 gm sugar (you do need this much sugar to balance out the taste
and give the jerky the sweet flavor). Stir like crazy with hand
or fork in one direction for ten minutes or till the pork is thoroughly
amalgamated and very sticky resembling a paste. Don't skim on
this step, the stirring is needed to create the correct texture of the
jerky. Yes, your arm will feel like it's gonna fall off at the
end, just consider it your exercise for the day!
2. Dollop a third of the paste on parchment paper cut to fit a
baking tray (mine measures 30cm X 31cm). Cover the paste with
plastic wrap and roll it out with a rolling pin into 2-4 mm
thick. The thinner the paste, the crispier it gets after
baking. (A 4-mm thickness will yield chewy jerky)
3. Bake at 150C/250F oven for 16-18 minutes depending on the
thickness. This step is merely to dry out the pork.
4. You can then increase the temperature to 175C/350F and bake for
another 13-18 minutes. Watch the pork like a hawk at this stage,
it can get black very quickly due to the amount of sugar used in the
recipe. The edge needs to get very brown, even burnt-ish to
develop the correct flavor of pork jerky. Cool on rack, cut into
strips (trim off the very dark egdes) and eat!
5. In my version, after the initial baking, I put the pork on the
BBQ away from the charcoal, covered, for 15-20 minutes each side
(depending on thickness). Use a timer because that few minutes go
quickly and before you know it, the pork will get burnt. When
both
sides have been grilled, move the pork over charcoal for 20-30 seconds
each side to brown it. That's it!
If you serve your friends this chargrilled pork jerky in
your next BBQ party, you're gonna be the star! (Have plenty of
cold beer or soft drinks to go with it)
P.S. 1. Since the jerky has no presevatives in it, leftover is
best frozen rather than just refrigerated. I dunno how long it
keeps in the freezer but I've eaten thawed month-old jerky with no ill
effect and no change in flavor.
2. To be frank, both the oven and charcoal method produce the
same delicious result, so if you don't want the hassle of setting up
the grill, the oven method is good enough.
Back to top
